While pondering new ways to enjoy the delicious, pure maple syrup I made myself from our own maple trees, I invented a new drink. I call it the Montpelier, named for the maple syrup capital of the USA. While perhaps not as famous as our cousins to the north, the US does produce its fair share – or some share at least. Vermont is number two in the world in maple syrup production, right behind Canada. I also thought the name was appropriate since the drink is to some degree adapted from the Manhattan.
If you like your cocktails a bit booze-forward, like an Old Fashioned or a Manhattan, this might be your new favorite. It’s not overly sweet, but has enough complexity and rich flavor to make it a solid pick.
Two measures of Bourbon (or rye, if you prefer)
One measure of sweet vermouth
A teaspoon of pure maple syrup. I use my own home-made syrup, boiled down from the sap of the maple trees in my own back yard. If you don’t make your own maple syrup, Vermont maple syrup is preferred over the Canadian stuff – just because it’s named the Montpelier, of course. Use what you must, though! Just not that fake garbage you see ten-year-olds pouring over their hotel lobby pancakes.
For a properly American garnish, try Peppered Maple-Glazed Bacon. Glaze a strip of thick-cut bacon with maple syrup and a bit of fresh ground black pepper. Bake until crisp, cut into short lengths and skewer it for the rim.
Add all of the ingredients to a mixing glass with ice. Stir until well chilled and properly diluted, about 30 seconds or so. Strain into a coupe, or serve over a large ice cube in a rocks glass.
Here’s a quick recap of the lessons I learned during our first year of maple tree tapping and maple syrup production. It’s my to-do list for next January.
Be prepared. I need to make sure I have everything I’ll need lined up ahead of time, cleaned, sanitized, and ready to go early. I’m pretty sure we missed a week, possibly two, of the sap run this year. Better to be ready in January.
I need to have two or three dedicated maple sap buckets, with airtight lids and at least 1/2 gallon markings, to hold at least a couple days worth of sap.
A hydrometer is a must. Trying to accurately measure the temperature of a small quantity of maple syrup is hard. The temperatures also seem to be a terrible way to estimate sugar content. I bought a hydrometer this year, and for next year I’ll have a testing cup on hand as well.
For the sap, a refractometer would be helpful to know the sugar content so I know what to expect when boiling it. Not essential, but they’re cheap so I’ll probably buy one.
Have plenty of propane; make sure there are at least two full tanks on hand.
Have bottles and labels on hand for the finished product.
More spiles and bags, unless I switch to plastic drip lines and containers on the ground (which would probably be better anyway).
A boiling pan with more surface area would be better. I’ve got a year to explore better evaporating options. I don’t want to go overboard, but maybe there’s a better option.
I may set up a small RO system. It would cost some to set up, but would greatly reduce the boiling time and save on propane. I’ve got time to investigate and decide whether I want to set one up. Next year I’ll have at least 6 taps going in 6 trees — four here, two at a rental house we own.
After all the “learning curve” experiences over the past couple of weeks, we’ve finally got our first batch ready to bottle.
Using the turkey fryer to boil down the sap was a big step. There are faster and better ways, but this is what is practical right now. Ideally I’d like to have a 2′ square or 2 x 3 syrup pan, but that’s a purpose-specific item that would cost a lot and take up a lot of room for eleven-plus months of the year. The fryer does a passable job, and I’ve learned to just let it go until the sap is very nearly syrup before finishing it on the stove. The first time I emptied the stock pot there was still too much water; it took a couple of hours to boil down on the stove. Last night I brought in the second run; it was very close to being “done” when I poured it into the pan.
After sorting through our thermometers, I found one digital kitchen thermometer that reads in half-degree increments well past the point where our maple sugar would turn into maple candy. That has made the process so much easier and better. I can reliably get the temperature right where it needs to be. Unfortunately, I’m still not sure whether I’ve got it right. The resulting syrup seemed a bit thin to me. I ordered a maple syrup hydrometer from Amazon (they’re not expensive). Once it arrived, it confirmed my suspicion that the sugar content was a little low. I had to boil it a few more minutes, bringing the temperature up to 221 F. The next step will be to bottle the 2 quarts we have finished.
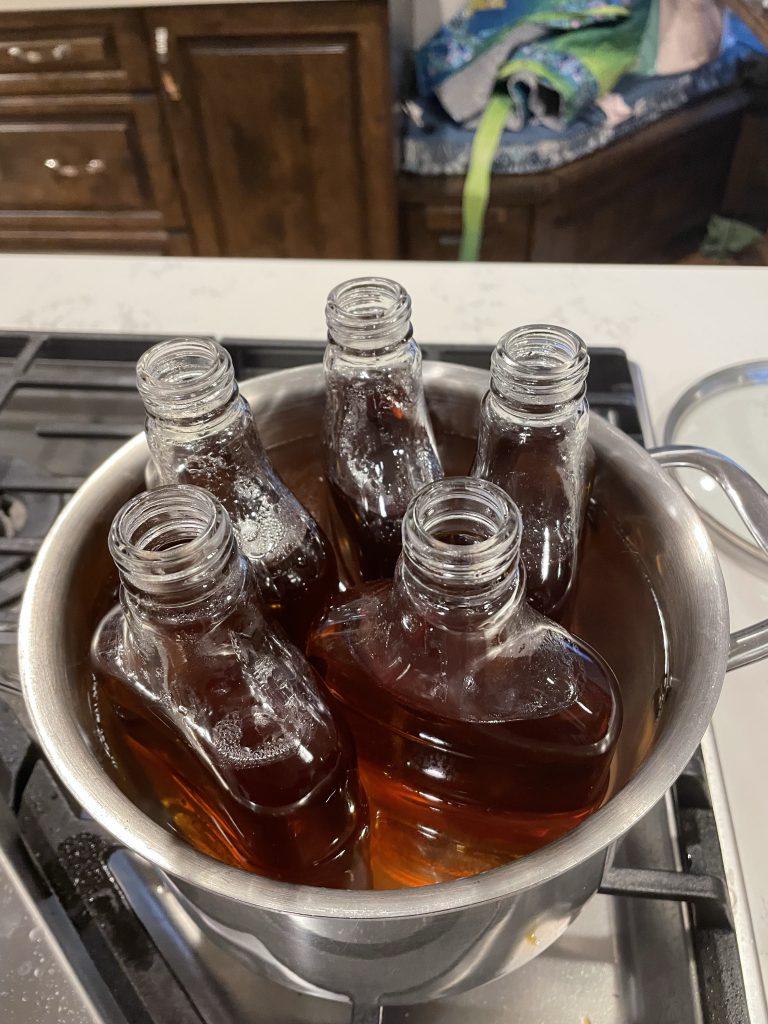
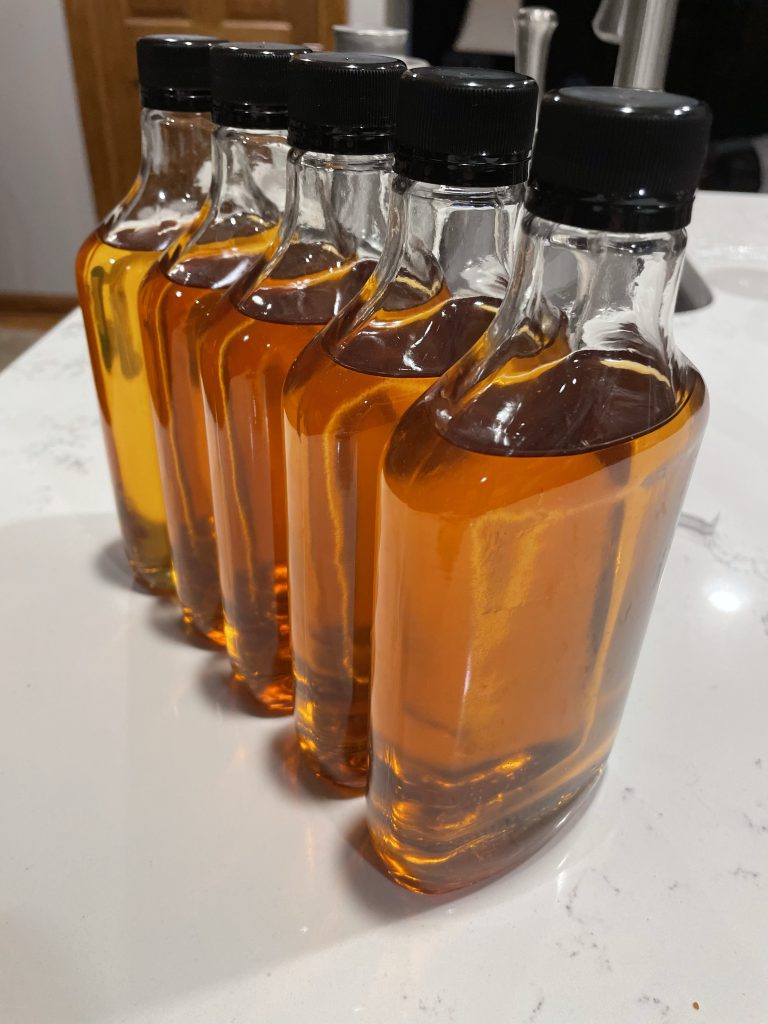
We have far more syrup than I ever imagined we’d get. Remember, when I started this I figured maybe I’d get enough maple syrup to anoint a stack or two of pancakes. Well, we’ve got about half a gallon now and there will be more. We’ve got nothing to store it in long term, and I’d like to share some with friends and family. Half a gallon is way more syrup than we’d use in a year. I ordered some maple syrup bottles and am working on ideas for a label to stick on them. Until then… yeah, I got impatient and bottled the first batch in these flask-shaped 375 ml bottles. As I write this they’re sitting in a pan pasteurizing before I put the caps on.
Pasteurizing the bottles before cappingCooling down while I ponder how to label the bottles
When I started this my goal was just to try it out and see if it would even be possible to get a little bit of syrup from our two larger trees. I was not prepared for what’s happened, even on this tiny, tiny scale. Not to give away the ending, but If I had known what would happen, I’d have prepared better. I’d have had multiple buckets marked in 1 gallon or maybe even 1 quart increments. I’d have filled both of my propane cylinders. I’d have picked up the propane turkey fryer from my son and had it scrubbed out. I’d have probably done the tapping a little differently.
When the weather is warm, I’ve been getting an average of 5-6 gallons of sap per day from the two trees. I can’t say exasperated much, because I’ve been emptying the sap collection bags at varying levels of fullness. My buckets aren’t marked, and sometimes I just empty them directly into the stock pot. The message here is that I’ve gotten a LOT of sap, relative to the amount I thought I’d see, and it’s gone on for days longer that I expected. As I write this it’s 27 degrees F (that’s 2.78 C for my friends outside the US), well below freezing, and it’s overcast. The collection bags were emptied late yesterday; I’ll still have to go empty them again this afternoon. That will be another five gallons or so. But I’m getting ahead of myself; let’s back up to this past weekend.
In my last post, I described my efforts to boil the sap down to make syrup. I can tell you a few things that simply won’t work. Boiling sap on your stove — no, don’t bother trying. Sure, it will work. Eventually. Your house will be a rainforest. We’ve got a good sized place and you could tell the humidity was getting higher, even with the vent hood turned on. And that electric roaster pan? Nope. It heats from the sides, not the bottom, so you can pour in 4-1/2 gallons… and it will steam, but not boil.
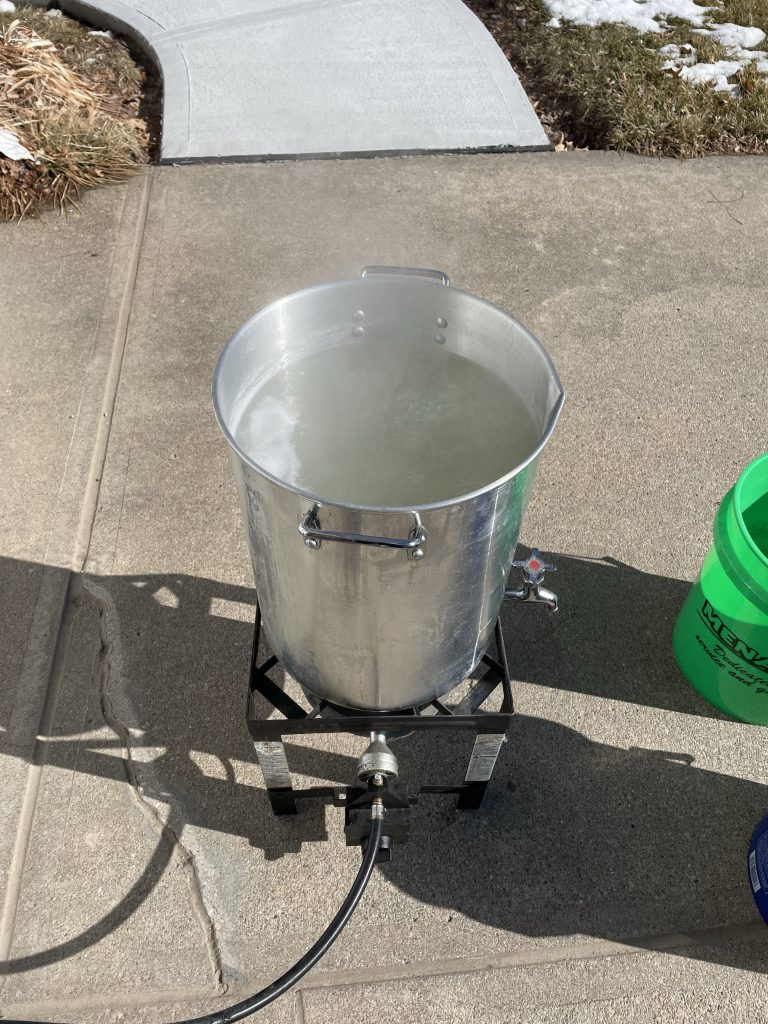
I bought a turkey fryer a couple of years back. I’ve never used it myself; it’s lived over at my son’s house where it’s been used to fry a few turkeys. It’s got a stock pot that will hold about 7 gallons (call it 26 liters) and a propane burner. Pete dropped it off for me. That took a little scrubbing to get completely clean and ready for sap duty. As I now had about 8 or 9 gallons of sap, I filled it and fired it up. As the level dropped during the day I’d add in more sap. Seven hours later I’d reduced the first batch down to less than a gallon and brought it inside to finish — it was late and dark, and I’d been having to run out every 13 minutes all day and reset the 15 minute automatic shut-off timer. This was way, way too labor intensive. And how much sap was that? I have no idea. If I were to guess I’d say maybe 9 gallons or so. Maybe more, maybe less, I have no way to keep track.
The turkey fryer, full of fresh sap and some partially boiled sap
Once inside on the stove, it took another couple hours to get to the point where the candy thermometer indicated (to the best of its very limited ability) that we might have maple syrup. Unfortunately it’s got nowhere near the resolution I need to see when the boiling temperature reaches 217 degrees. Why 217? Well, at our elevation, water boils at 209.5 F, give or take half a degree based on barometric pressure, so I add 7.5 to that to hit 66% or a little better sugar concentration. It’s an approximation (more on that later).
It’s getting closer to being syrup, and starting to take on that beautiful color!The first batch… chapter one.
I finally called it quits when things were looking and feeling like syrup. It bugged me, though, that I didn’t really know for sure how close I was. After cooling it was apparent that the “syrup” was a little thin, and a little light in the rich flavor you’d expect. The next morning Lisa turned the burner on low heat and, not knowing any better, told me about it several minutes later. By the time I got it shut off, it was about to boil over. What we ended up with completely crystallized into a solid tan block of maple sugar once it cooled off. I didn’t take a picture of that, but it was a touch over half a liter of solid maple sugar.
This year I decided to try something I’d been half-jokingly threatening to do for several years. Namely, tap the two big maple trees in my back yard and gather sap to make maple syrup.
I wasn’t expecting this to work well. They’re not sugar maples, for starters; they’re silver maples. Not even the second or third choice for syrup production. They’re big enough, though, and I finally decided to spend a few bucks on some equipment to give it a try. I figured, best case, maybe it would be a little bit of fun and maybe we’d end up with enough maple syrup for a stack of pancakes.
To do this you need a few items. First, you need spiles. These are the taps that get tapped into shallow holes drilled in the tree trunk. Not wanting to spend a big chunk of money on specialized buckets and other stuff that would be of limited or no use and would need to be stored 11 months of the year, I went with some plastic spiles and a bag collection system. The kit came with the proper size drill bit, three spiles, three PVC bag hangers, and three 4-gallon plastic bags. I thought the bags were pretty ambitious.
You’re supposed to start this as soon as the weather starts getting above freezing during the day, and drops below freezing at night. I didn’t anticipate things getting as warm as soon as they did, so I was a week or two late getting the supplies ordered. I honestly figured I’d probably missed the window to do this, but decided to give it a shot anyway. Once I had everything together I headed out to the back yard with my cordless drill, the spiles, a small mallet, and the collection bags. I picked the larger of the two trees to start with.
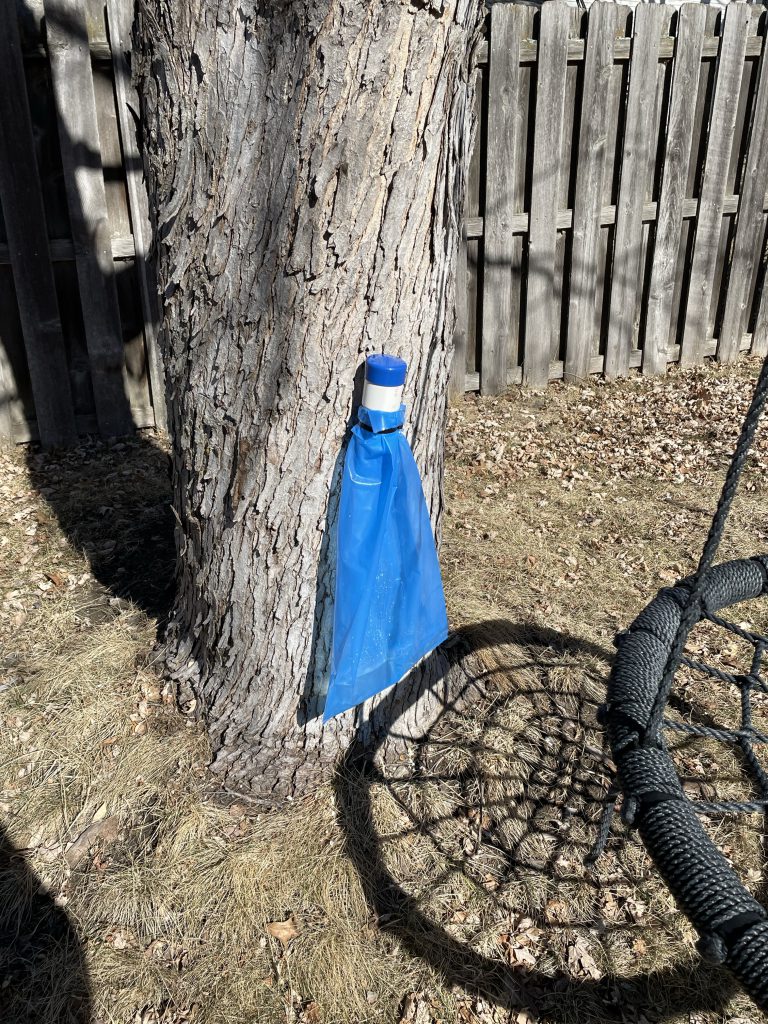
I’d already marked the drill bit with some tape at the proper depth, about 2”. I drilled the first hole on the south side of the tree (happily facing the house) and gently tapped the first of the spiles in place. I noticed that it immediately started dripping clear, watery sap. That surprised me. I hung the bag on it, and saw it was dripping regularly – about once per second or so.
A tree with spile and collection bag attached. The liquid in the bag is about 15 minutes worth of sap.
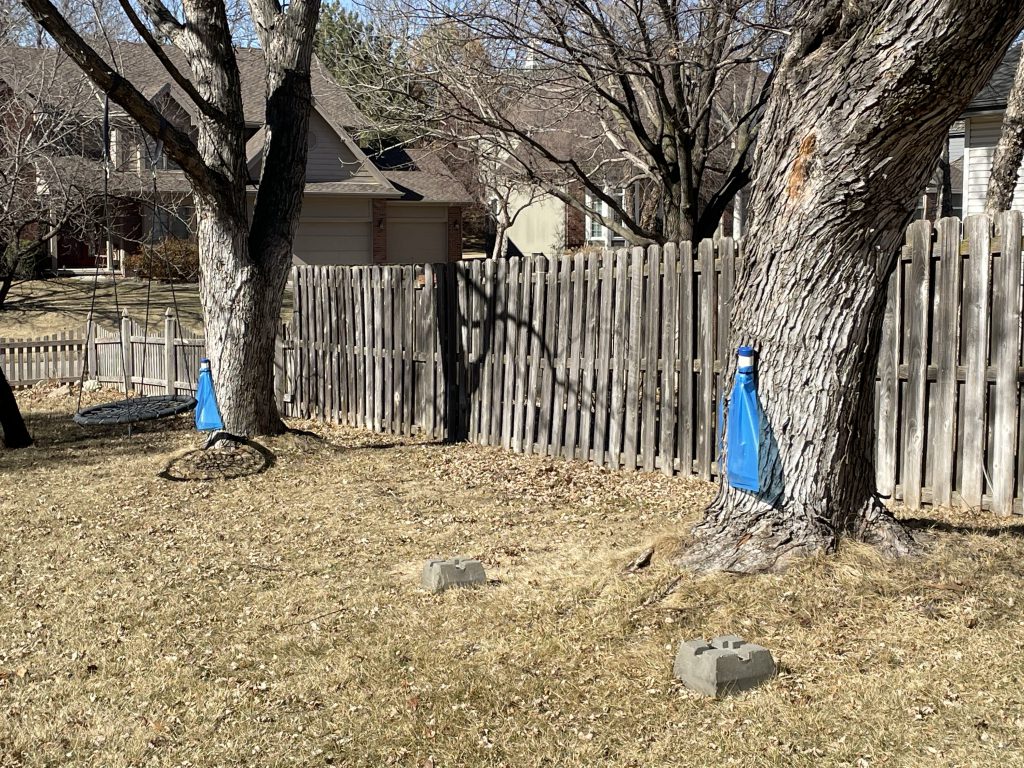
Moving to the other tree, I repeated the process there. This time the tap started dripping even faster, nearly twice a second. This was looking much better than I ever thought it would. Since I had a third collection setup and the first tree is actually large enough (according to my online research) to support as many as three taps, I started a second one about a quarter of the way around the trunk from the first one. All three were happily dripping away, much to my surprise.
I went back in, but couldn’t help look out the window often to check on the progress of our little maple syrup production line. I saw the bags show a little collected liquid in the bottom. Then it looked like there was about a cup in each bag, with the tree on the left (west) side outpacing the other one. Then it looked like maybe a pint. I checked often throughout the afternoon, amazed at the rate at which the sap was running out of those trees. By 5 PM, I decided I’d empty the bags. Much to my delight and amazement, I got about three gallons of sap total. Before we went to bed I’d collected another gallon or more.
Both trees tapped. The tree nearest the camera has a second tap on the other side of the trunk.
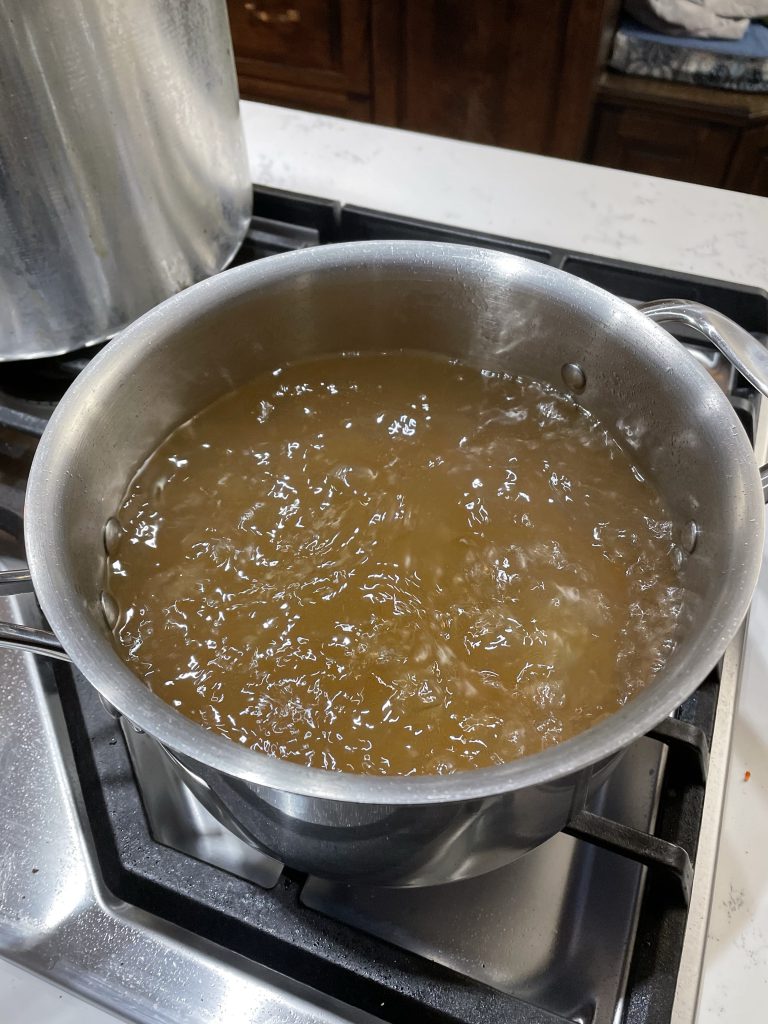
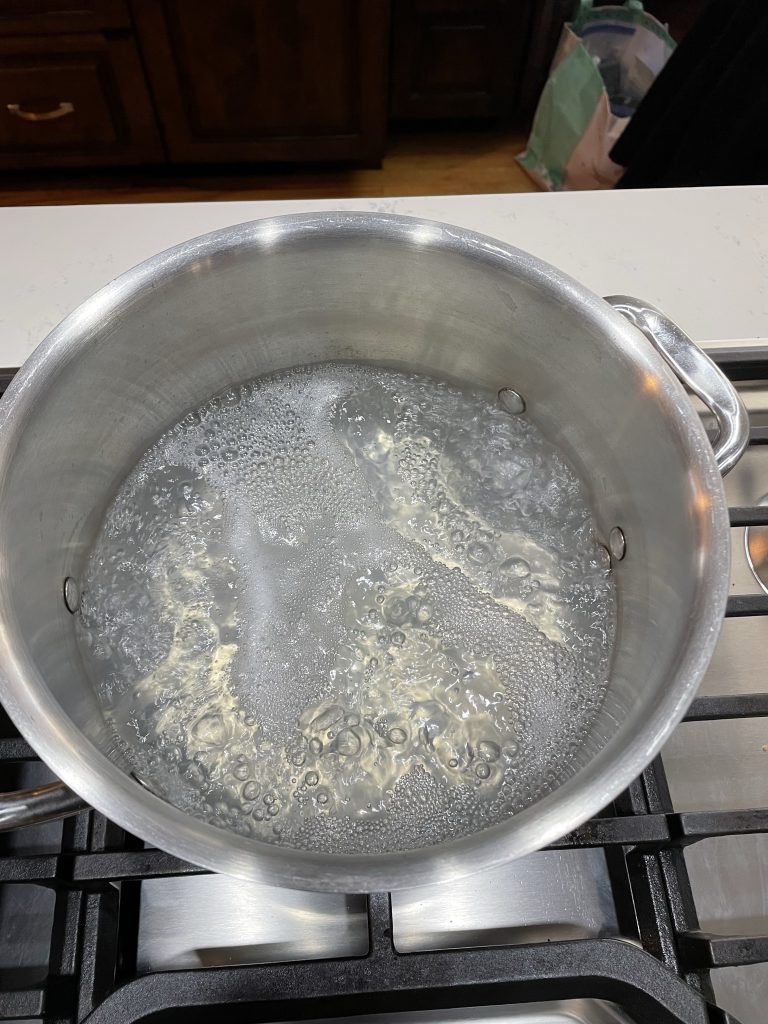
Maple sap is clear and looks like plain water. The sugar concentration, depending on several factors, can range from 1 to 3 percent sugar. I tried a little sip; it’s very, very slightly sweet. Maple syrup is, by definition, 66% sugar. To get from sap to syrup takes a lot of evaporation by boiling. You’ve got to boil 5 gallons of sap down to about a pint of syrup… or even less. Everyone will tell you this needs to be done outside. Needless to say, I tried it in the kitchen. A couple of hours of boiling sap down in a stock pot got me maybe 1/10 of the way there or less, but at least the sap – reduced by about half – actually tasted a little sweet. The humidity, however, was rising in the house to the point that I decided enough was enough and shut off the burner.
Maple sap boiling on the cooktop
That was yesterday. Today was overcast, colder, and raining. We probably got another gallon or so from the collection bags, maybe a bit more. Combined with yesterday’s collection and after the boiling, there was about 4-1/2 gallons or so. Not bad for the first try, started late in a suburban back yard. Being struck with what seemed like a good idea, I brought the 18 quart roaster oven up from the basement and filled it with sap, then turned it on and let it cook for a few hours. Unfortunately it’s just not up to the task of boiling that much liquid with the lid off. I can’t see the point to trying it with the lid on, since the whole point is to reduce the sap by evaporation. On the bright side, I figure half an hour at 180 degrees will kill off any bacteria and hopefully render the sap good for a couple more days until I can set up the propane turkey fryer for some serious boiling. I’m also hopeful tater can get another few gallons of sap before it’s time to call it quits until next February.
I made these on the grill last night. There was some room for improvement, as always, but I thought they turned out OK. The tough part is the timing, especially when it’s 45 degrees and windy – stuff cools off fast.
I started with four large boneless, skinless chicken breasts. I sliced partway through the chicken, then sprinkled with cilantro and lime pepper and doused them liberally with Italian dressing. They marinated in the fridge for a few hours. Cut the onions and peppers into slices, then toss them in a bowl with some olive oil, a little salt and fresh ground pepper.
After marinating, grill the chicken breasts. I used a perforated veggie grilling pan to grill the sliced onions and bell peppers. Nothing is as good as veggies grilled in olive oil! When the chicken is done, slice it and cut the slices into fairly small chunks. Put the tortillas on the grill. Sprinkle shredded cheese, followed by the chicken and veggies on one half. Flip the other half over to cover, grill until it’s hot and starting to brown. Turn the quesadilla over and finish grilling. We used uncooked flour tortillas; if you use the cooked ones the timing is way less critical. After grilling add the diced tomato and avocado slices, then cut into quarters and serve.
Lisa and I were shopping a week or so ago, and were intrigued by a package of falafel we found. We’d both heard of falafel, but had never tried it. It sounded pretty good — so we bought some.
I have to say, this stuff is horrid. We’ve tried it in various forms — plain, dipped in ranch, with salsa, cut up in a fish taco, and last night I gave it a shot with some feta cheese — then with feta and ranch. Nothing doing. The only way to make this stuff palatable seems to be to mask it’s flavor (reminiscent of wet cardboard and pencil shavings) with salsa, and lots of it. Honestly, I’ll try anything a few times to try to get it right, but the remaining half of these little hockey pucks are probably going to become plant food.
I don’t know how hummus can be so good, and falafel so nasty. If you know of a way to make these things palatable, please let me know!
I’m surprised by the number of people who don’t eat rice because they have no idea how to cook it properly. And let me tell you, folks, if Uncle Ben’s or Minute Rice is your idea of what rice tastes like, you have no idea what you’re missing.
The way to perfect rice is simple and doesn’t require much effort. You can have it cooking while you work on the rest of the meal. The method I use is Continue reading “The way to perfect rice”